Wednesday, April 2, 2014

Gallery of Winter Projects

This Winter was a time of cleaning up various Un-Finished Objects, plus a few small new things. None of them were worth an individual blog post.

A representative baby sweater of several that I knit.
Horseshoe Cable Mitts. An original pattern that I am writing up to offer.


Tentacle Mittens, because she wanted them.

Dalek Hat for a Who fan.


Octopus Ornament. 3/4 of an octopus.


Tablet Weaving - A Simple Computer

Tablet Weaving, also called Card Weaving, has always fascinated me.  I can't walk past a gadget without taking a closer look. It's an inherited trait. My first exposure must have been as a child. I remember that my mother had a book on weaving, though I never knew her to practice that craft. Over the years, I have looked at looms and longed to try one.  Never happened. A couple of years ago, I finally bought a rigid heddle loom and started investigating weaving with serious intent. The topics of Inkle Looms and Tablet Weaving came with the territory.

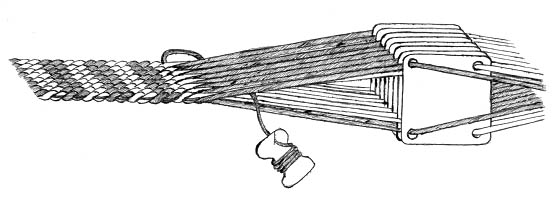
Tablet Weaving is the technique of using small, hole-punched tablets/cards to manipulate the warp yarn in weaving. The most common cards are square, with holes punched in each corner. The warp yarns are threaded through the holes. Rotating the cards raises or lowers the yarns to create spaces (sheds) for weaving.  The patterns that can be made using tablet weaving are beautiful and complex. Essentially, tablet weaving is a simple computer.

Tablet Weaving is a CHEAP hobby for me. An add-on craft. I was able to cobble together a loom using materials I foraged around the house. My tablet weaving loom is made with C-clamps,  dowels,  and a binder clip.  I chose to buy weaving cards and a book, for convenience. It is entirely possible to make your own cards and use online instructions. For the woven band, I am currently using crochet cotton yarn. I will also try using various wool yarns that I have.

Here is the best graphic I have seen of Tablet Weaving, courtesy of  Shelagh Lewins.
http://www.shelaghlewins.com/tablet_weaving/TW01/Fig_4.jpg


Sunday, September 15, 2013

Baby Poncho

Babies don't wait for my schedule.  I have not been knitting this summer. I discovered that one of my coworkers is pregnant. I learned in late August that she has never had anyone knit anything for her. I felt duty-bund to correct that situation.
I've actually made two items for her, but am showing only one right now. The pictured item is a poncho, which seems unusually appropriate for infants. A poncho can work really well with the straps of a car seat.

The second item is a deep rose-colored shrug. I will show that in my next post. This will be my first attempt at killing (steam blocking) acrylic knits. I expect the poncho and the shrug to look smooth and drape nicely after that.

Friday, July 19, 2013

Tatting class project

The tatted project shown, is Rhapsody, from a pattern written by Yarnplayer, Marilee Rocklee. She is a great tatting resource. Marilee has an online Shuttle Tatting class that I am taking. Although I taught myself the basics of tatting years ago, I'm only now getting serious about it. This course is great for reinforcing my skills and taking them to the next level.
The project shown, Rhapsody, is quite pretty. I've made it in a pumpkin-colored thread, Lizbeth size 20.
Given the heatwave we are having, tatting is perfect. It's small and fits in my pocket. I almost always have a shuttle in my pocket these days. It's a nice change from knitting.
I may make this motif in a number of colors to give away.

Looks like October


This in my rendition of a vintage tatting pattern from a 1944 pattern book. The color scheme was accidental. I had shuttles loaded with black and orange thread. I like this sample well enough to plan a project for a Halloween item.  My tatting has improved over the past month. Although I am a self-taught tatter,  I recently started an online tatting class to tie my knowledge and skills together. I've learned everything piecemeal, which is frustrating. There is no standardization in tatting. Next post, I will show a project from the class.

Wednesday, May 22, 2013

New Handles for Old Crochet Hooks

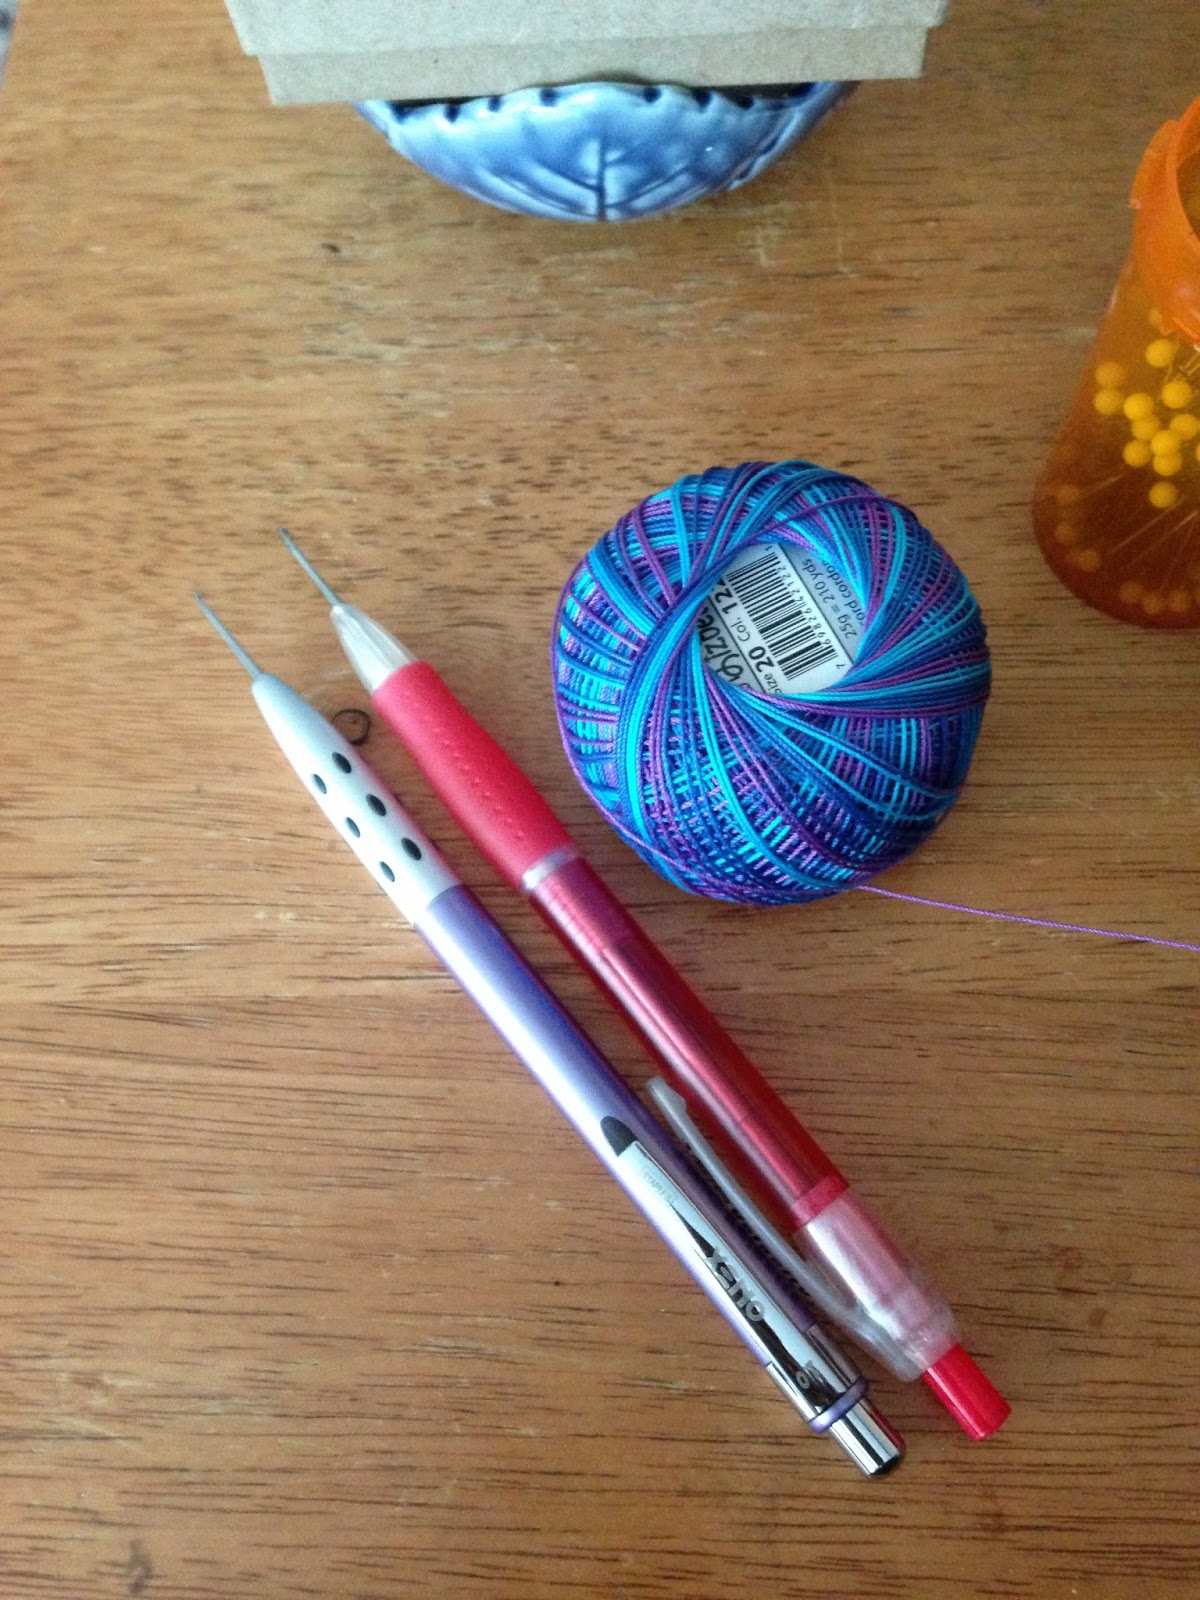
Those are not pens. Those are fine steel crochet hooks shown in the photo. This is my solution to the problem of losing small steel crochet hooks. I have a couple of these floating around. I've had them for years and have no idea how I acquired them. None. Most likely, I got the hooks in a collection of other knitting needles and crochet hooks that I have acquired. Some were given to me and I once or twice bought assortments of tools on eBay. 
Generally, I don't do much crochet. I certainly haven't done any crochet with fine cotton in many years. These hooks have been languishing in drawers or pencil cups.  Until I learned how to tat.
Tatted motifs are joined by drawing a thread through a tiny loop called a picot. A small steel crochet hook is the BEST tool to perform this function. Yes, you can use the pointed "pick" end of some tatting shuttles for this purpose. You can also go bats**t insane in the process. (It works for larger thread/larger picots.)
Small steel crochet hooks, in their naked state, tend to get lost. I drop them. The cat helps me drop them. If I put them in a bag, plastic or fabric, they tend to poke right through the material. Irritating.
It is perfectly possible to buy crochet hooks with large, "ergonomic" handle and neat little caps. You will also pay a fortune for those hooks. A barenaked set of steel hooks costs about $7.00-$14.00, depending on the number of hooks. The same set of steel hooks in plastic handles, suddenly costs $60.00. Not happening. My current solution is to ransack the ballpoint pen supply in my household, substituting steel hooks, for the ink cartridge. So far, I've found two or three casings that work with the hooks. Eventually, I might trim the hooks down to make them retractable. That's a future project. For now, I'm happy that the hooks have a nice handle, are easy to see and can be clipped to a pattern. They don't poke through bags nearly as much, now. One casing, not shown, uses the pen cap to cover the hook. I love inexpensive solutions.

Return to Tatting

This is my tatting set-up. At the moment I am just sick of knitting. That seems to happen every so often. 
Last summer I finally, finally got serious and taught myself to tat for real. After a good nine months of neglect, I've picked it up and am making some progress. Of course, we're talking about...expensive progress. I just had to buy  few more tatting books. Worth it.
I've finally discovered the world of modern tatting patterns. The newer sensibilities are much more to my taste. One reason I didn't put any effort into tatting before was that the designs were just dreary, and old patterns tend to be written out in long hand. 
I like charted knitting patterns and the same is true for tatting patterns.
The photo shows one of my two tatting boxes. Both boxes are metal lunchboxes. One box, not shown, simply holds my balls of various cotton threads. The box in the photo, gets all the action. The storage compartment is filled with my tools, tatting shuttles, scissors, pins, tapestry needles, and small steel crochet hooks. I have fitted the lid of the lunchbox with a cork board, to use in arranging or blocking pieces.
At the moment, you can see a completed bookmark pinned out, made from a pattern by Tat-a-renda. I liked the look of just the first two rounds of the pattern, so I omitted the last round of the pattern.
My current sample, shown pinned at the lower left corner, i s  trefoil edging. I'm making that to use up the thread left on the shuttle from the bookmark. Thread used is a size 20, Lizbeth Cotton cord. The cord is a variegated mix of pretty blues and violets that looks great until you actually use it in a project. Just as in knitting, variegated cords aren't suitable for all projects. The color distribution looks better in the trefoil edging than in the bookmark. Complicated pieces will be made in solid or tonal cords from now on.

Wednesday, February 27, 2013

Augustine Cowl

 I have a fairly new coworker named Bonnie. She was hired last Autumn to replace someone who relocated to another state. A few days ago, I found Bonnie is tears at her desk. Her daughter had been deployed to Afghanistan and was en route. The travel time is about 48 hours total. It broke my heart to   see Bonnie in such distress, but I am relieved to report that her daughter arrived safely. She will be away for about six months.
 Yesterday, I wore a knit scarf to work. The pattern is called Augustine and is shown in detail above. The triangular scarf  is knit with a fingering-weight wool sock yarn, KnitPicks' Imagination. The color is called Looking Glass. Bonnie admired the scarf and I offered to make something for her. I had already planned to make something, planning for have it ready for her birthday or Christmas. In other wordsplenty of time.

I should KNOW better by now.  Don't try this at home. I think from now on, I will keep my mouth shut and knit things as a surprise, on my own terms.  When I asked Bonnie what she might like, she told me that she wanted fingerless gloves, in off white. No problem.  Somehow, that changed into a green  infinity scarf to be completed by St. Patrick's Day. Today is February 27th. There goes all my free time for the next 2 weeks! 


The green yarn that I will be using is also from KnitPicks. The color is called Frog Prince, now discontinued.  The yarn can be seen in the small photo above, taken from a previous project.

The Augustie pattern has a real bonus in that it expands wonderfully due to dropped stitches. I haven't done a pattern like this in a long time. I am hoping this is a VERY quick project.

Wednesday, December 19, 2012

Professor Barbie Ralph Kraken

This is Professor Barbie Ralph Kraken, in her new home out West.
I knit this from Hansigurimi's Nudibranch pattern. It was a very fast knit that I was able to complete pretty easily in about two days of watching football. The colors used were grass green and oddments of blues and purples from my stash.

 While this certainly isn't the only project I have knit in the past
couple of months, it is definitely the most interesting. Most of my time has been spent making rather mundane things to warm the hands. My husband and kids let me knit these things in any color I choose as long as it is black or gray. Boring.

That being said, I have amused myself by keeping notes and taking photos with the hope of writing and posting a pattern for fingerless gloves. I have learned just how much I hate doing this. Publishing knit patterns is not in my future.

Saturday, October 6, 2012

For a Ravens Fan

Wow, I knit this some time ago, at the end of the school year. Then I think the weather got hot and knitting wool hats was just not the thing. Now, football season is upon us, the weather is cold, and I am feeling guilty about not mailing this to the recipient. For the record, the pattern is called Scrap Metal Hat, and it is and absolute joy to knit. A fast, easy knit.

Morrison Tartan Stockings

These are the (essentially) finished Holiday stockings shown next to examples of the Morrison tartans. On the left is the Morrison Hunting/Ancient Tartan, which is the prettiest sett. The blue stocking I knit actually resembles the darker, Morrison Society/Modern tartan. The darker blues and greens were used because those yarns were available. If I were to knit kilt hose to be worn, I would dye the yarns to match the fabric. That will not be happening any time soon. My husband refuses to wear a kilt. I am not about to hand knit tartan hose to be hidden under a pants leg. On the other hand, our eldest son does wear a kilt. He may get a pair of textured kilt hose....when he graduates.
The right hand sash and stocking are the Morrison Red sett. Technically, the tartan has dominant red and green colors, but it does not read that way visually. I knit the stocking to look like a better match for the sash.  Both stockings were knit flat and then seamed. That method is necessitated by the intarsia diamonds and commonsense. These patterns may also predate circular needles. 
Snarky note- My mother-in-law, from Edinburgh, never learned to knit anything in the round. I suspect, also that she considered circular knitting an unseemly American practice.

Monday, August 27, 2012

Learning Tartan Hose

This is my second attempt at a tartan stocking. The first try was essentially a swatch, using stash yarn. That swatch taught me that colors need to be chosen carefully. There was nothing wrong with the knitting. I just hated the colors.
On to the swatch in the picture..... My husband, Ian is Scottish, born in Edinburgh. His grandfather came from the Isle of Lewis,which is the hereditary home of a branch of the Morrison clan. According to the Scottish Tartan Authority, there are two main Morrison Tartans, a Green Hunting Tartan, and a Red Morrison Tartan.  In addition, each major tartan has modern and ancient versions that vary in color.
     The photo shows the leg portion of a tartan/argyle stocking being knit according to a traditional, two-needle, flat pattern. Tartan hose are knit flat because the colored diamonds are knit using the intarsia  (block) method.  I'm knitting this piece using two strands of fingering yarn throughout. The doubled strand of yarn is an important design feature in tartan stockings. Argyle patterns feature diamonds. Tartan patterns may be distinguished from argyle, by the addition of "marls" which are combination of two colors to give a heathered effect. I knit this project with two strands of yarn in order to create a custom marl yarn as needed.
    The blocks of a tartan pattern are knit in solid and marled patterns, which are taken from the main colors of the woven tartan. Additional colors used in the woven tartan have been added as diagonal "rakers".  I chose to add the rakers using duplicate stitch. Rakers can be knit directly into the diamonds. I chose not to do this, partly for simplicity. A secondary reason to stitch the rakers in later is that I can change my mind. I like seeing how the main colors work together before I add additional colors.

Monday, June 25, 2012

(Re)Learning to Tat

 Those miserable scraps at left are the result of my learning to tat.....again. Actually, I'm almost pleased by this.


I have been curious about tatting since I was in high school. During my freshman year, we had a German exchange student, Karen Volker who was the buxom, sexy, blonde of the high school boy's dreams that year. She was a sophisticated 16 years old to my lowly 14 years. She had a German accent. She could act!  Woecakes and jealousy. She was the student aid in my first year German class. Poor girl must have been bored to TEARS! I don't think I ever had a real conversation with her all year. What I DO remember is that she started tatting during class. That got me fascinated. In German, the word for tatting is Schiffenarbeit. It means "boat work" and refers to the shuttle used.


I did learn how to make the basic tatting double stitch many years ago, probably as a college student. I never did much with tatting, though. I did buy some books, which are collecting dust in the basement. The problem is that classic, Victorian tatting patterns are just horrific. They are poorly written and the designs simply say "outdated, fussy". I simply could not find anything I wanted to make enough to bother.


Admittedly, I did not see the potential in tatting.  Next post will have more info.


Leaf Concept for a Baby

The photo at left shows a project I made up on the fly. It is a small baby blanket/receiving blanket.

I made it simply from a pattern for a decorative small leaf. Now that I think about it, the shaping is very similar to that for a shawl. In this case, I just kept increasing far, far beyond the size of a normal leaf. This became truly mindless knitting. I made the project the size of a receiving blanket because that was the smallest size that fit within a reasonable standard.  Final dimensions are about 28" across the center of the leaf. I think it is perhaps 40" long. Those numbers are guesses. I knit the leaf to get a gauge of at least 28" 

I used Red Heart Recycled yarn for this project. Originally, I bought the yarn for a leaf-themed baby sweater that I am just starting. The blanket part was a sudden inspiration. Baby things get made in acrylic yarn so that they are machine washable and hypoallergenic.

For once, I have no recipient for this gift. I may just keep this one myself for a while. I am hoping that the next couple of baby projects are pretty special.

Sunday, May 20, 2012

Baby Update

This is a pleasant update. Someone I knit for was kind enough to send me a photograph of my project in action! I am thrilled. This sweater clearly has room for some growth.
Knitting for an appreciative recipient makes it worth while.

Lazy Enough to Be Efficient

 I've been quite busy, knitting rather than posting. The last post, three months ago was about a baby sweater I knit in four days. Immediately after I completed that sweater, I learned of another baby, this one born prematurely. I set about knitting a second sweater which is shown at the right.  I have also started working on a baby blanket and sweater set with a leaf theme. I have now remembered exactly why I HATE baby blankets. This one is half done. I can sensibly photograph it soon.


Wednesday, February 22, 2012

Four Days Baby Sweater

Now it can be told. The men in my household are all taciturn. It's hard to get vital information out of them.
James came home from school in early February and mentioned that one of his favorite teachers, a mentor, had departed for paternity leave.
That was all the information I got. No gender, no name, nothing. I went to my "gift" stash and found a pair of baby legwarmers. Not right. I searched through my yarn stash for gender neutral yarns and settled on a navy blue acrylic. I four days, I completed a sweater/jacket in the 6 mos-1 year size. I actually looks good.
Present delivered and I think the recipient was both surprised an pleased. I'm determined to knit a small stock of these to have ready. My only problem is choosing colors. I get totally indecisive about color choices for babies. I want to choose something other than the traditional pink/blue/green/yellow. What works?

Metro Bauhaus

I'm STILL not sure what to make of this project. I love the colors. They are exactly what I like to wear. I love the look, which evokes the Bauhaus School of Design. The pattern I used was called Metro Cowl, which specified laceweight yarn on a size 8 needle. That does not work for me. I substituted a worsted weight yarn and got something different than the pattern. The main difference is the width of the stripe. Obviously, the laceweight yarn would produce finer stripes. Even so, on size 8 needless? For me, the laceweight yarn that I have purchased is quite fine, like a crochet cord. Putting that on size 8 needles produces a loose mess. Worsted weight yarn knits up nicely but changes the look and texture. The original cowl had a red zipper sewn in. Instead of a zipper, I added a red strip. I did this because my neck is short and a zipper, especially an open zipper, would be abrasive and uncomfortable near my skin.
I ended up knitting a full lining for the cowl, to make it warm and to prevent the fabric from rolling. It may work.

Wednesday, February 15, 2012

Knitting Under Any Circumstance

January was not a good month. On January 5th, I was in an auto accident. Luckily, no one was injured. Luckily, the accident happened in the parking lot at work and the weather was mild. Also, the accident was clearly not my fault. I am grateful for all of that. Really.

Still, it WAS an auto accident. My car is still not fixed, some five weeks later.....

How does this relate to knitting you ask? Well....
After the immediate flurry of accident-related duties involving insurance and phone calls and the other guy driving away, I was left waiting for the tow truck to collect the remains of my car. While I was waiting, I sat an knit on these fingerless gloves. I'm sure I was a sight to see, sitting in a crashed car, knitting away. Frankly, the knitting kept me sane. It also kept me from visibly freaking out while my body figured out just how stiff, sore and grumbly I was going to be the next day.

My car is old, but not quite worth totalling. I'm on my second rental contract. Ouch. At least my hands are warm.
The pattern used is Jacoby, which I have knit before and will knit again. Easy and looks good in sock yarn.

Raven Needed a New Bag

I knit a bag to hold my knitting.....

In 2008 I knit a tote bag from Paton's SWS and have been using it ever since. My cat LOVES it. She sat on that bag at every opportunity. I have given up and given her that bag.

The photo at left shows my new, Windmill Bag, knit from my last stash of Slate SWS. It used exactly 3 skeins. This was a fabulous project on an advanced beginner level. The project was knit entirely in garter stitch. The bag is really just four short garter stitch strips. The strips could be sewn together, but I knit the bag in one piece, picking up stitches to start each new strip. The name, "Windmill" describes the layout of the finished knit, before seaming the sides.

I blocked this bag, but did not felt it. SWS felts very well, so I still have the option. Most likely, the bag will felt in use. This was a great, easy project.